Developing the RobotDesigner
Setting up the development environment
This section describes how to setup an environment for developing the RobotDesigner including a description of the suggested tools.
Note
This section assumes that you use either Ubuntu Linux or Mac OS X.
The RobotDesigner (and Blender Plugins in general) are written in Python. If you downloaded Blender as an archive from the dedicated website Python will be shipped with the package, if you installed it via package manager you will at first require a python installation. On Linux, you have to write the following commands in a terminal:
$ sudo apt-get install python3, python3-pip
$ pip3 install virtualenv
Pip is a package manager for Python and virtualenv creates a virtual environment where you can install additional Python Packages and tools while only affecting your project.
On MacOS it is suggested to install python via homebrew. After its installation, run the following commands:
user@hbp $ brew install python3
user@hbp $ pip3 install virtualenv
Now you need to download the RobotDesigner repository and to setup a virtual environment within its folder.
user@hbp ~$ cd projects
user@hbp ~/projects $ git clone ...
user@hbp ~/projects$ cd RobotDesigner/
user@hbp ~/projects/RobotDesigner$ virtualenv -p /usr/local/bin/python3.4 venv
user@hbp ~/projects/RobotDesigner$ source venv/bin/activate
(venv)user@hbp ~/projects/RobotDesigner$ pip install -r robot_designer_plugin/requirements.txt
(venv)user@hbp ~/projects/RobotDesigner $ deactivate
user@hbp RobotDesigner $
In order to work on the RobotDesigner, you need an IDE (or text editor). Modern IDEs provide you with features such as code completion, and automated refactoring, syntax highlighting, static code analysis, version control (e.g., GIT) and much more.
The suggested IDE is the community edition of Pycharm which is free to used in open source projects. A good alternative is the Atom editor which can be configured for the work with Python projects.
Editing with PyCharm (TM)
A brief description on how to configure the virtual environment with PyCharm can be found in the image below, please follow the indexed steps.
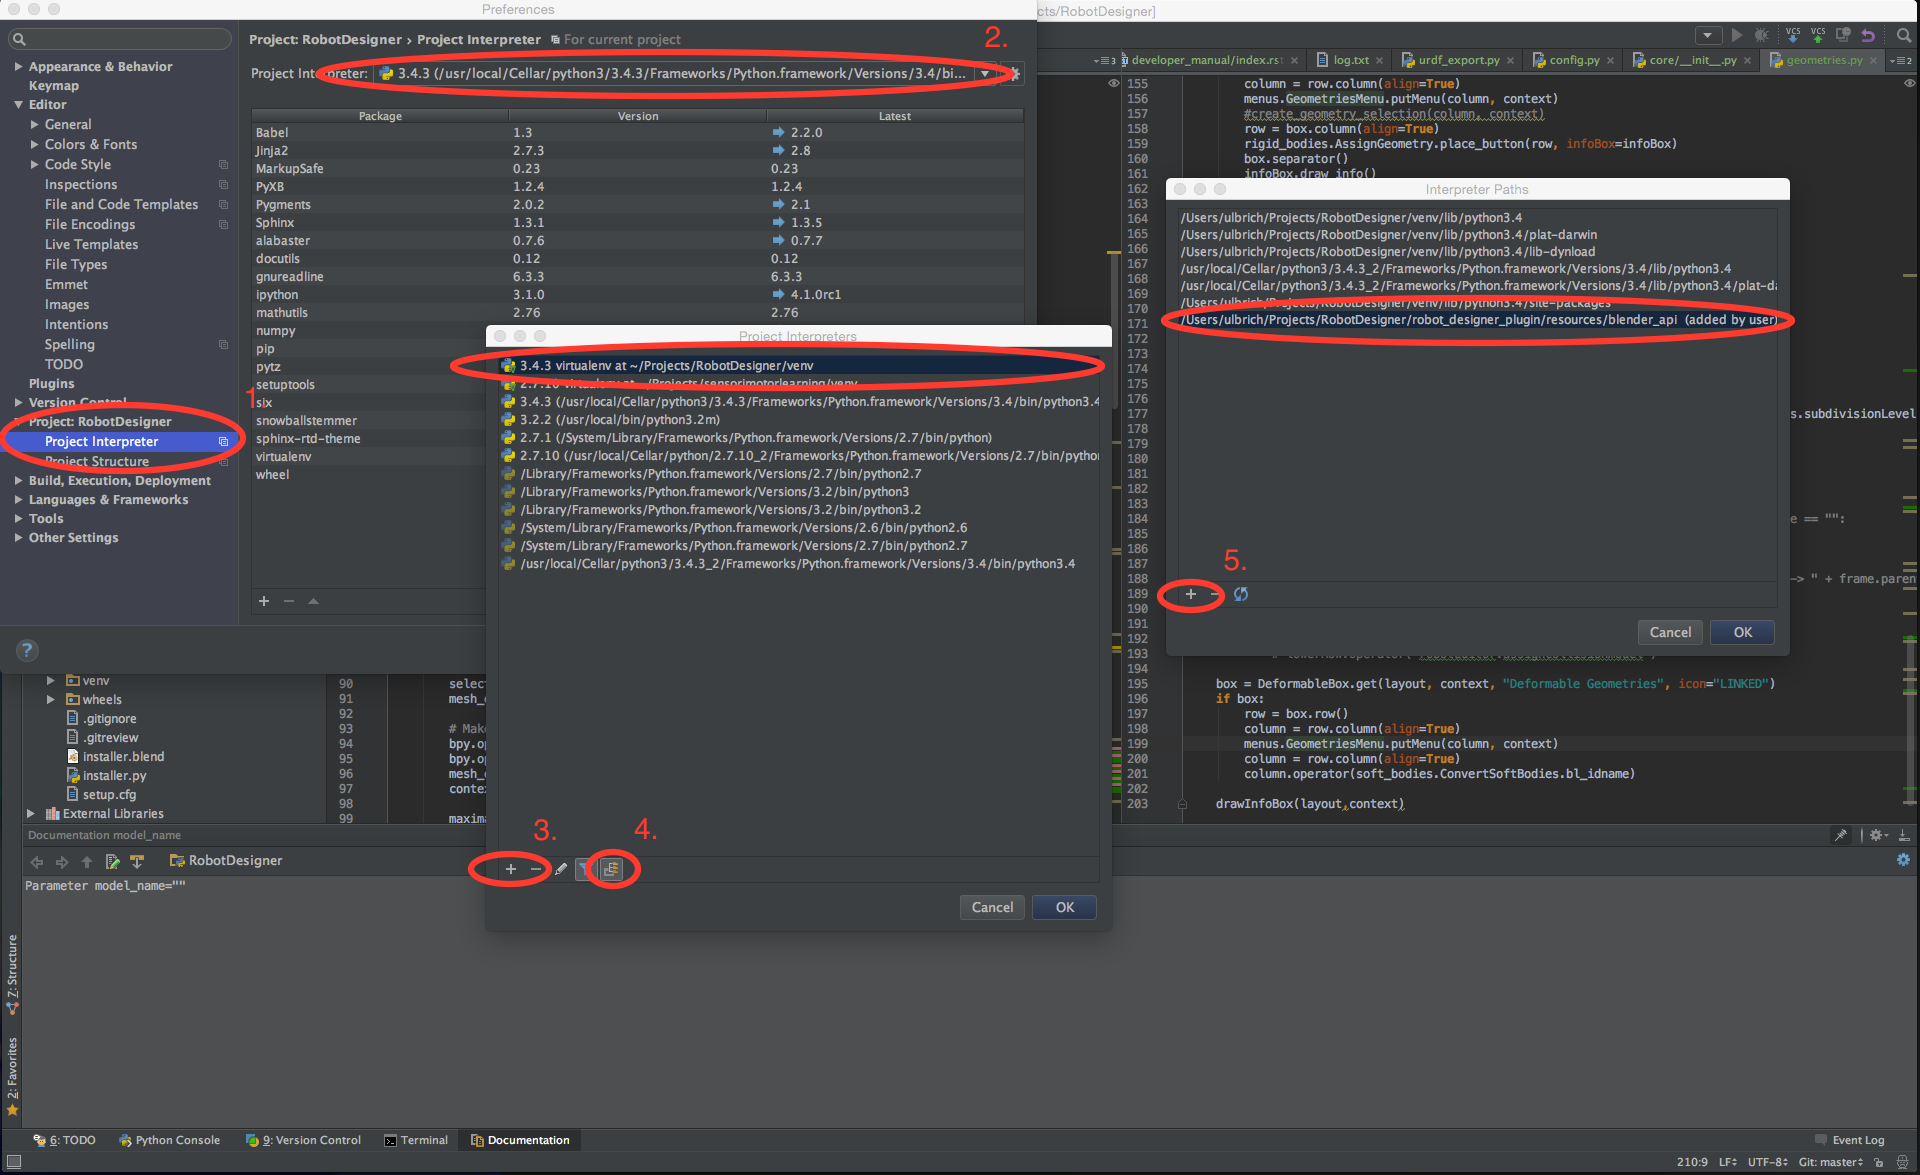
Setup for Pycharm with a virtual env (click to enlarge).
Editing with Atom
This editor is an interesting alternative for developing Python projects. According to its web page it is
A hackable text editor for the 21st Century
in the resources/templates folder of the RobotDesigner repository there are templates for setting up the
development environment. First, download and install the editor (from the homepage or a package manager).
Open the editor and add the RobotDesigner project (File->Add Project Folder).
Then close the editor and run the following commands to install the proposed setup:
user@hbp ~$ cd projects/RobotDesigner
user@hbp ~/projects/RobotDesigner$ cd resources/templates
user@hbp ~/projects/RobotDesigner/resources/templates$ apm install --packages-file package-list.txt
user@hbp ~/projects/RobotDesigner/resources/templates$ pip3 --install atom-requirements.txt
user@hbp ~/projects/RobotDesigner/resources/templates$ cat projects.cson >> ~/.atom/projects.cson
This gives you a basic configuration for the editor.
Note
This section is currently under development. For more information, please refer to the documentation of the individual packages:
Geometric operations in Blender
If executed in a text editor in Blender, add these lines first:
import bpy

C = bpy.context
D = bpy.data
scnd = [i for i in bpy.context.selected_objects if i.type =='MESH'][0]
model = C.active_object
Together with condition robot_designer_plugin.operators.helpers.ModelSelected.
Pose of segment in world coordinates
For example, Place an object (second) at the coordinate frame of the segment.
pose_bone = C.active_object.pose.bones[C.active_bone.name]
global_pose =  model.matrix_world * pose_bone.matrix
scnd.matrix_world = global_pose
Relative pose to segment
Retrieve the relative posiion of an object to a segment:
pose_bone = C.active_object.pose.bones[C.active_bone.name]
relative_pose = pose_bone.matrix.inverted() * model.matrix_world.inverted() * scnd.matrix_world
Bezier curves
import bpy
from mathutils import Vector, Matrix

C = bpy.context
D = bpy.data

model = C.active_object
pose_bone = C.active_object.pose.bones[C.active_bone.name]
parent_bone = C.active_object.pose.bones[C.active_bone.parent.name]

parent_frame = model.matrix_world * parent_bone.matrix
parent_to_bone = parent_frame.inverted() * bezier.matrix_world

bone_to_parent = bezier.matrix_world.inverted() * parent_frame

l = bone_to_parent.translation.length


bevel= bpy.ops.curve.primitive_bezier_circle_add(radius=l/0.25)
bezier=bpy.ops.curve.primitive_bezier_curve_add()

bezier.bevel_object = bevel

bezier.matrix_world =  model.matrix_world * pose_bone.matrix


print(bezier.matrix_world)
#e= C.active_bone.RobotEditor.Euler

bpy.ops.object.mode_set(mode="EDIT",toggle=False)


a=bezier.data.splines[0].bezier_points[0]
b=bezier.data.splines[0].bezier_points[1]


a.co = (0,0,0)
b.co = bone_to_parent.translation

v1 = bone_to_parent.translation

max_v1 = max ( abs(i) for i in v1)
print(v1,max_v1)
v1 = [ 0.1*i/max_v1 if abs(i)==max_v1 else 0.0 for i in v1]

v2 = parent_to_bone.translation
max_v2 = max ( abs(i) for i in v2)
v2 = [ 0.1*i/max_v2 if abs(i)==max_v2 else 0.0 for i in v2]
#v2 = Vector(v2)#.to_4d()
#v2[3]=0.0

a.handle_right=v1
#a.handle_left=-1 * a.handle_right
print(v1,a.handle_right,a.handle_left)

m=Matrix()
m.translation = v2
#m[3][3] = 0
#b.co = (bone_to_parent *m).translation
print(m, bone_to_parent.inverted() * parent_frame * m)
b.handle_left=(bone_to_parent * m).translation
#b.handle_left=-1 * b.handle_right
print(v2,b.handle_right,b.handle_left)


#print(a.co,b.co)

bpy.ops.object.mode_set(mode="OBJECT",toggle=False)
Building the documentation
The requirements necessary to build the documentation can be found in the requirements_docu.txt file.
The documentation is generated with the Python documentation generator Sphinx. It can be build with the following terminal command from within the BlenderRobotDesigner folder:
sphinx-build -b html docu/ output_dir
A preview of the documenation build can be seen by opening the index.html file from the build folder. The resulting output files need to be pushed to the GitHub repository branch gh-pages to make the documentation available online.